This post may contain affiliate links. Please read our disclosure policy.

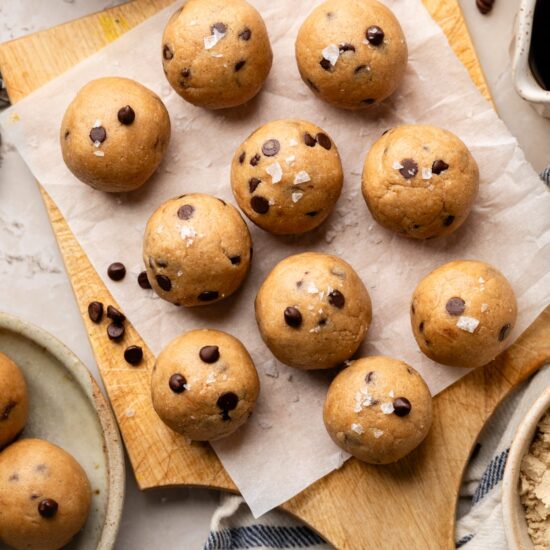
These no bake monster cookie protein balls are incredibly delicious and easy to make. They mix up in under 10 minutes and work great for meal prep. The perfect sweet and satisfying snack for busy days!
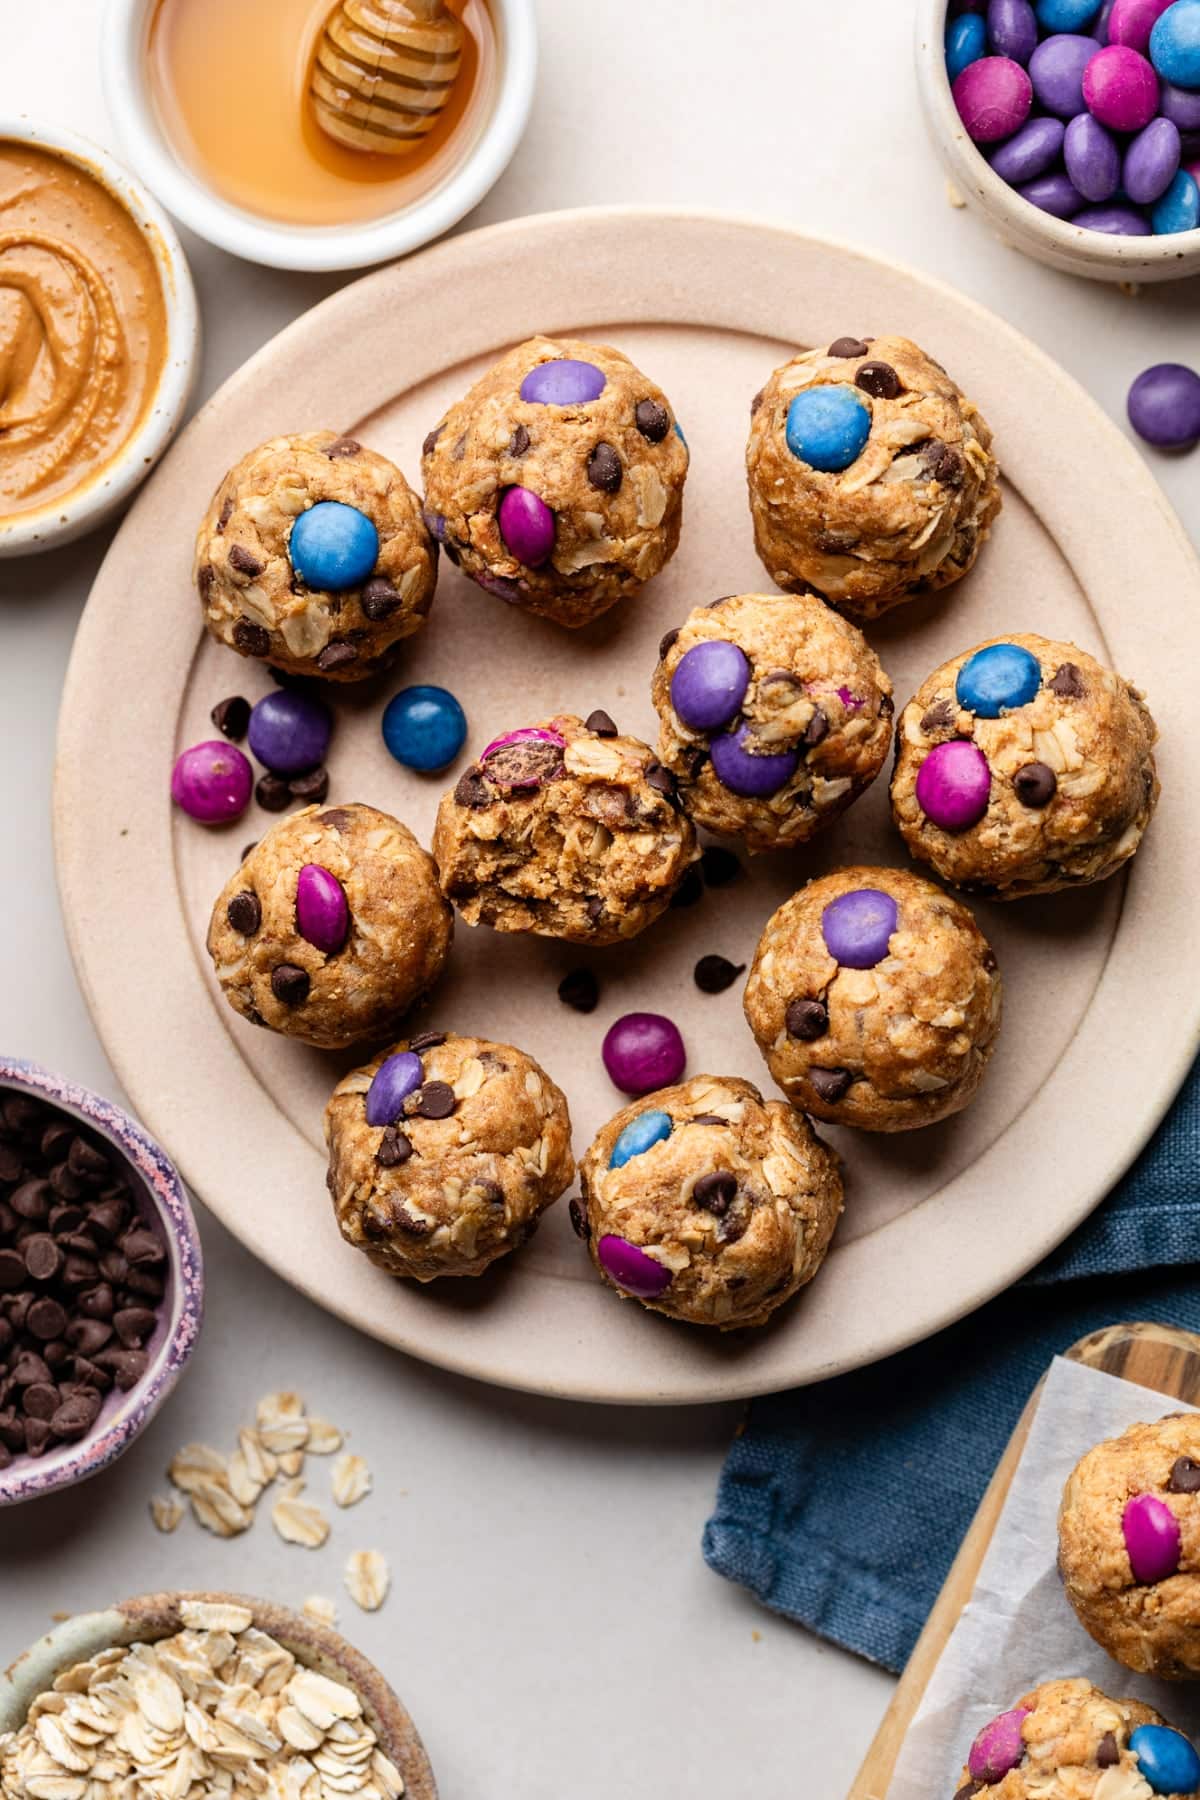
Monster cookies are one of those nostalgic treats that just make people happy. They’re everything you want in a cookie: chewy, chocolatey, and a little crunchy. That’s why I knew I had to turn them into protein balls.
Much like my favorite cookie dough protein balls, these monster cookie bites come together fast and never last that long. They are so delicious, and super easy to customize with your favorite chocolate. I always end up making a double or triple batch for meal prep so I’m never without a protein-packed snack.
Best of all? My kids love them too! They often have them with lunch or after sports games or practice. It’s a sweet and nourishing treat the whole family will love!
Jump to:
Ingredient Notes
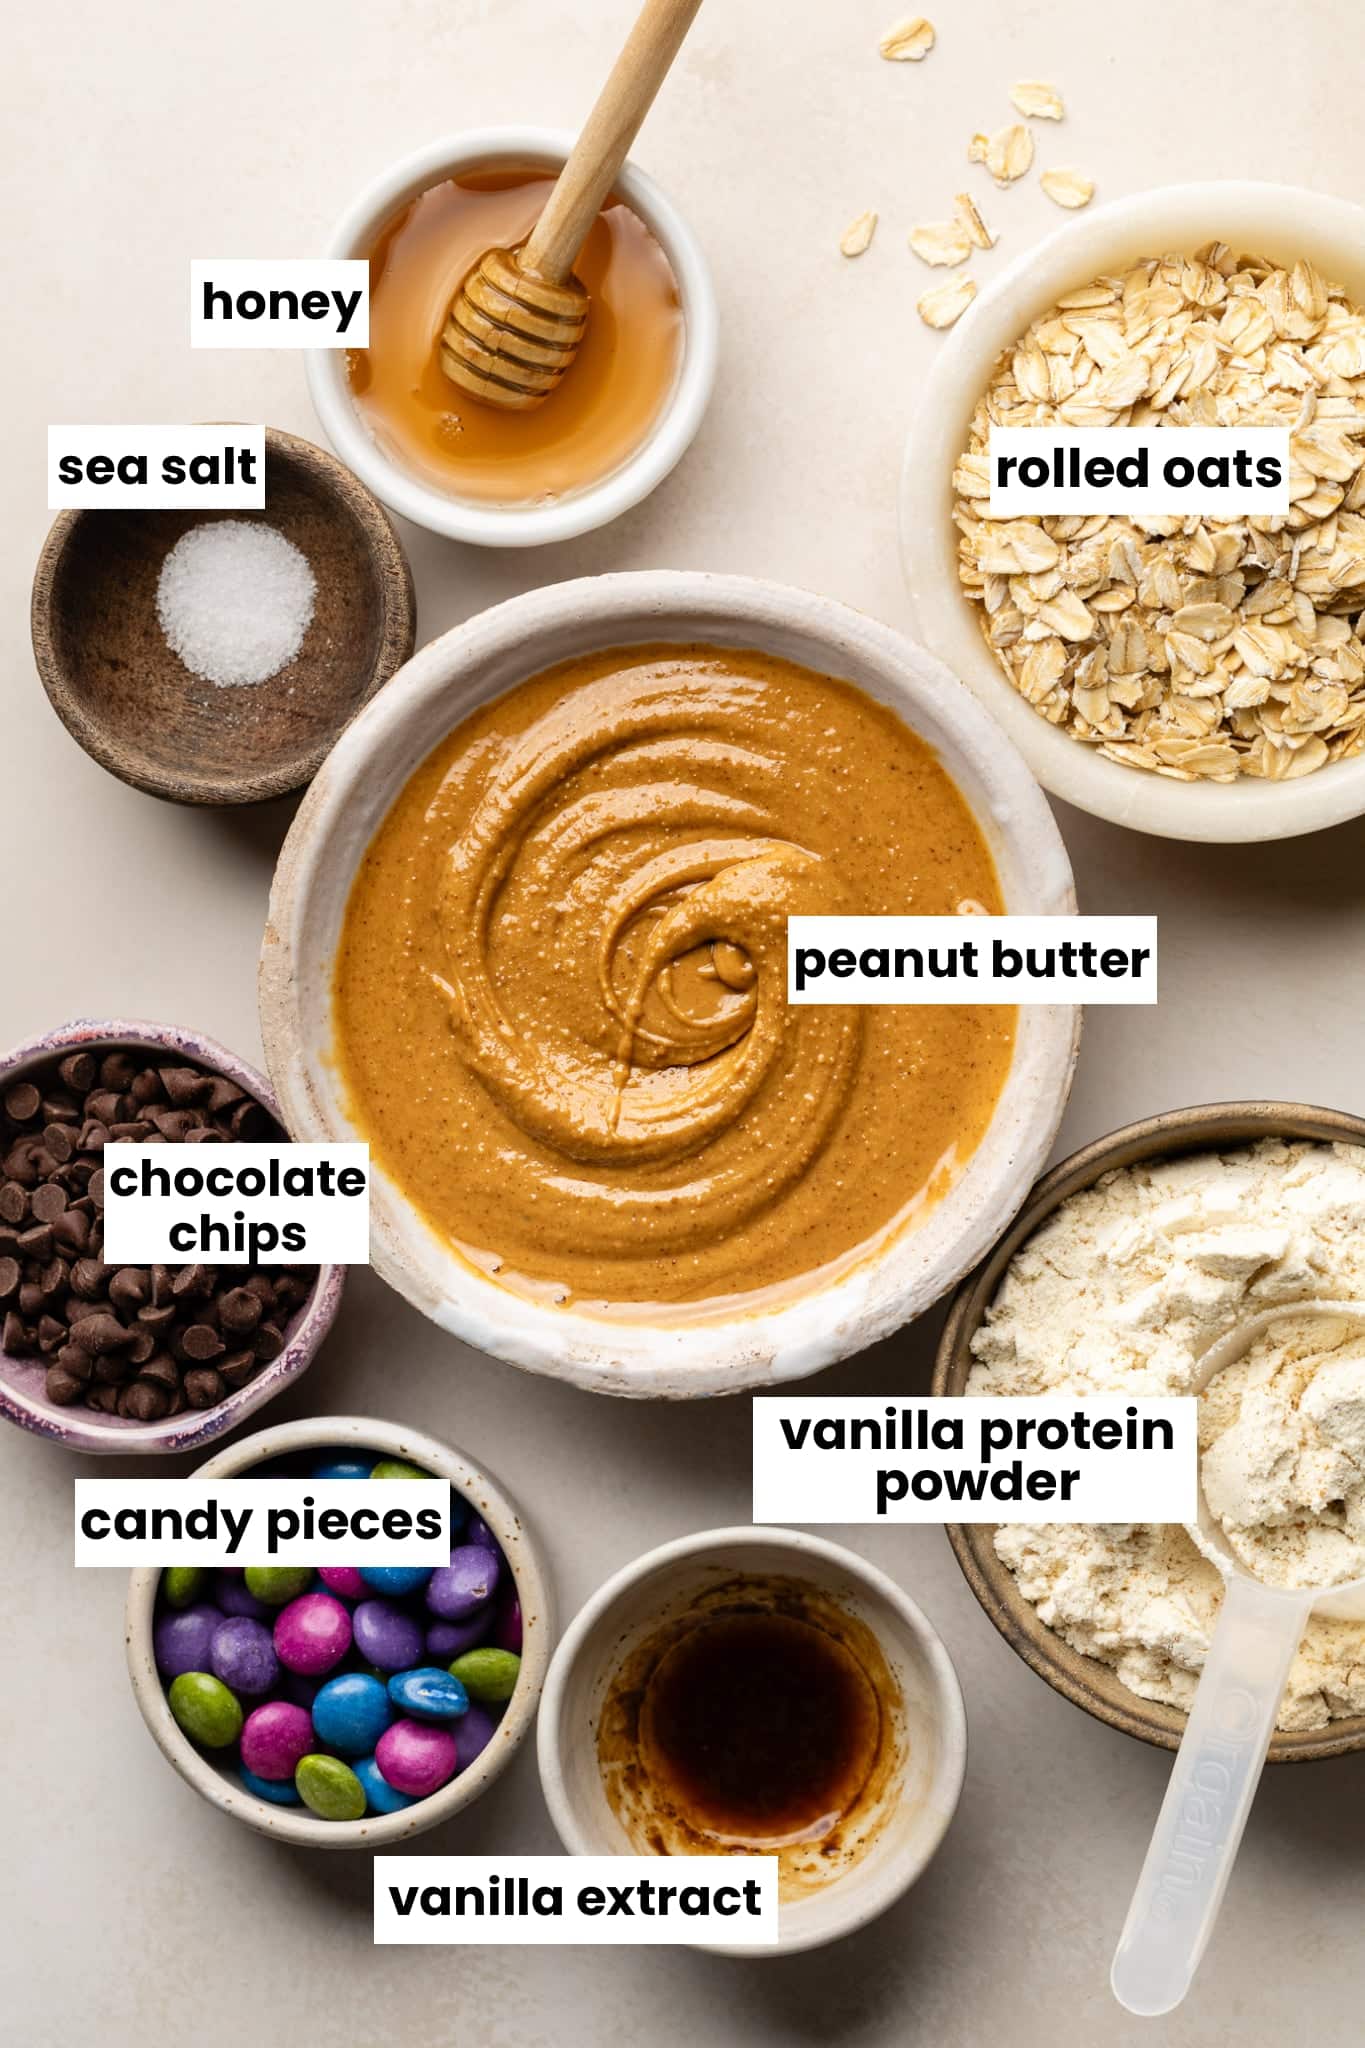
- Natural peanut butter: Use a natural peanut butter for the best texture and flavor. Stir well before measuring.
- Honey: This is the secret ingredient that makes it taste just like monster cookies! It also helps bind everything together.
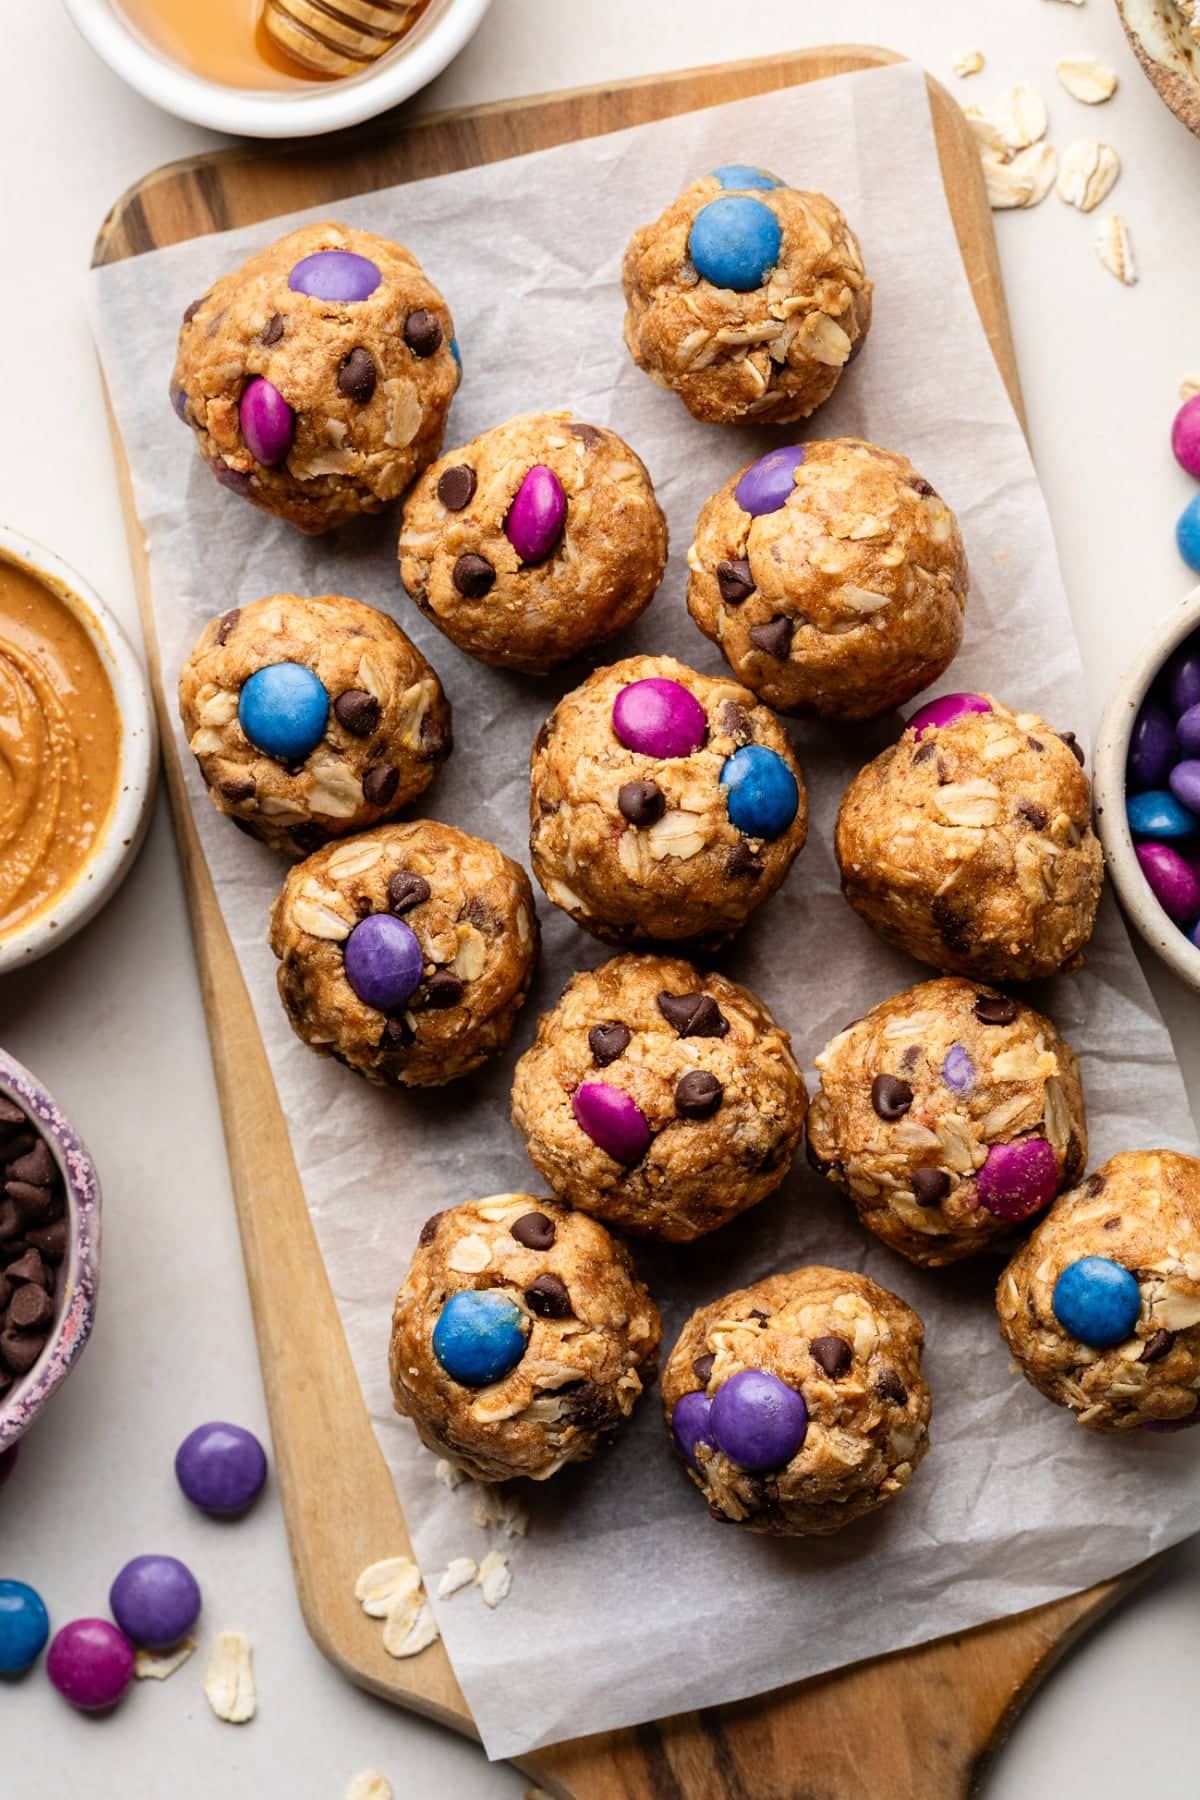
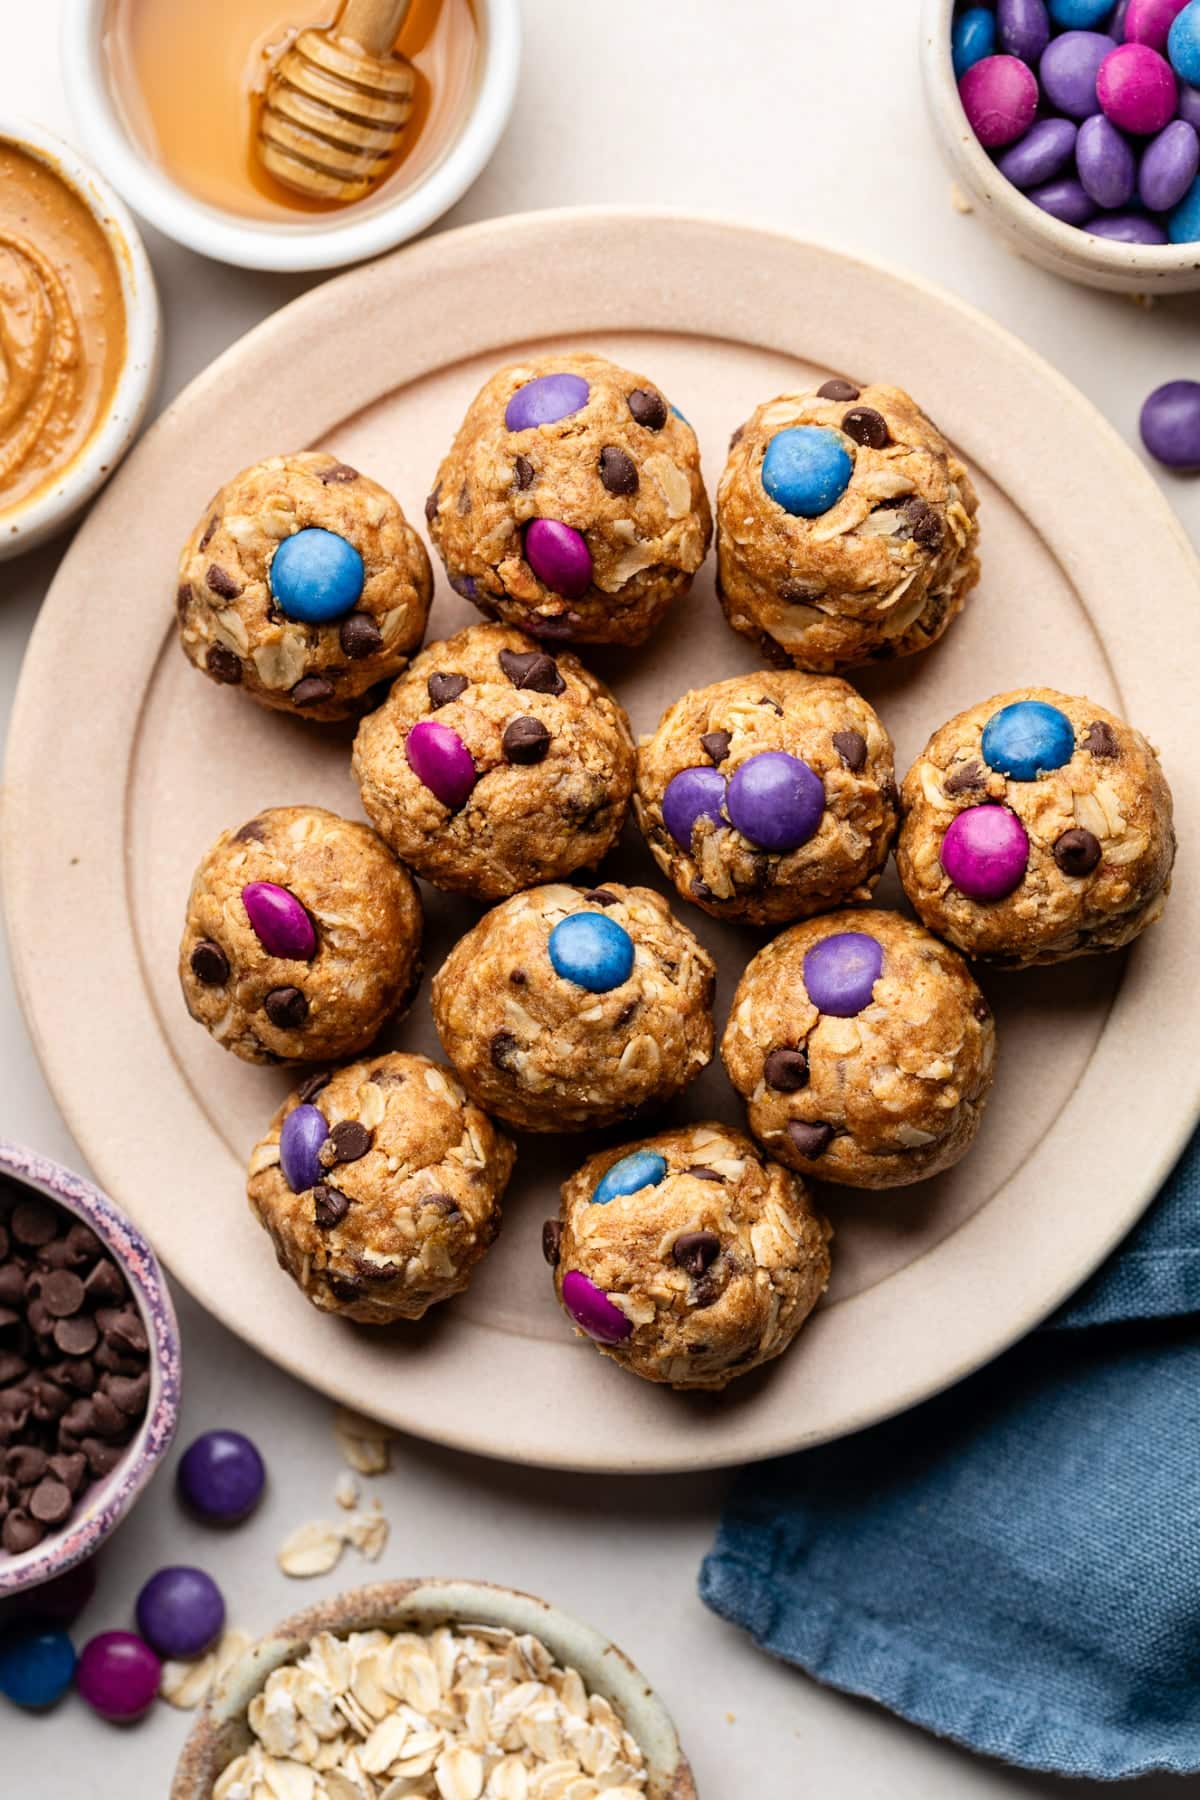
- Rolled oats: Use Old Fashioned Rolled Oats. They give the protein balls a chewy monster cookie texture.
- Vanilla protein powder: Any vanilla protein powder will work in these monster cookie balls, including beef protein isolate, whey protein, or plant based protein powders. You’ll get a slightly stickier ball if you use beef protein isolate because of the collagen.
- Sea salt: Use an unrefined sea salt for the best taste and added minerals. Reduce slightly if you use salted peanut butter.
- Mini chocolate chips: The mini chips distribute more evenly so you get chocolate in every bite. I like to use Enjoy Life Mini Chocolate Chips.
- Candy coated chocolate pieces: Any candy-coated chocolate you love will work. I like to use the Unreal Quinoa Gems or Milk Chocolate Gems!
See recipe card for full information on ingredients and quantities.
Substitutions
Want to switch it up? Here are some quick and easy shifts you can make:
- Peanut butter – You can use any other nut butter. Cashew or almond butter also work great!
- Honey – Swap for maple syrup. If you do this, they will be a little less sweet and not as sticky.
- Mini chocolate chips – You can use regular chocolate chips instead. You may want to slightly reduce the candy pieces or chop them up into pieces so everything mixes evenly into the dough.
- Candy coated pieces – Swap for white chocolate chips, crushed nuts, or chopped dried fruit!
How to Make Monster Cookie Protein Balls
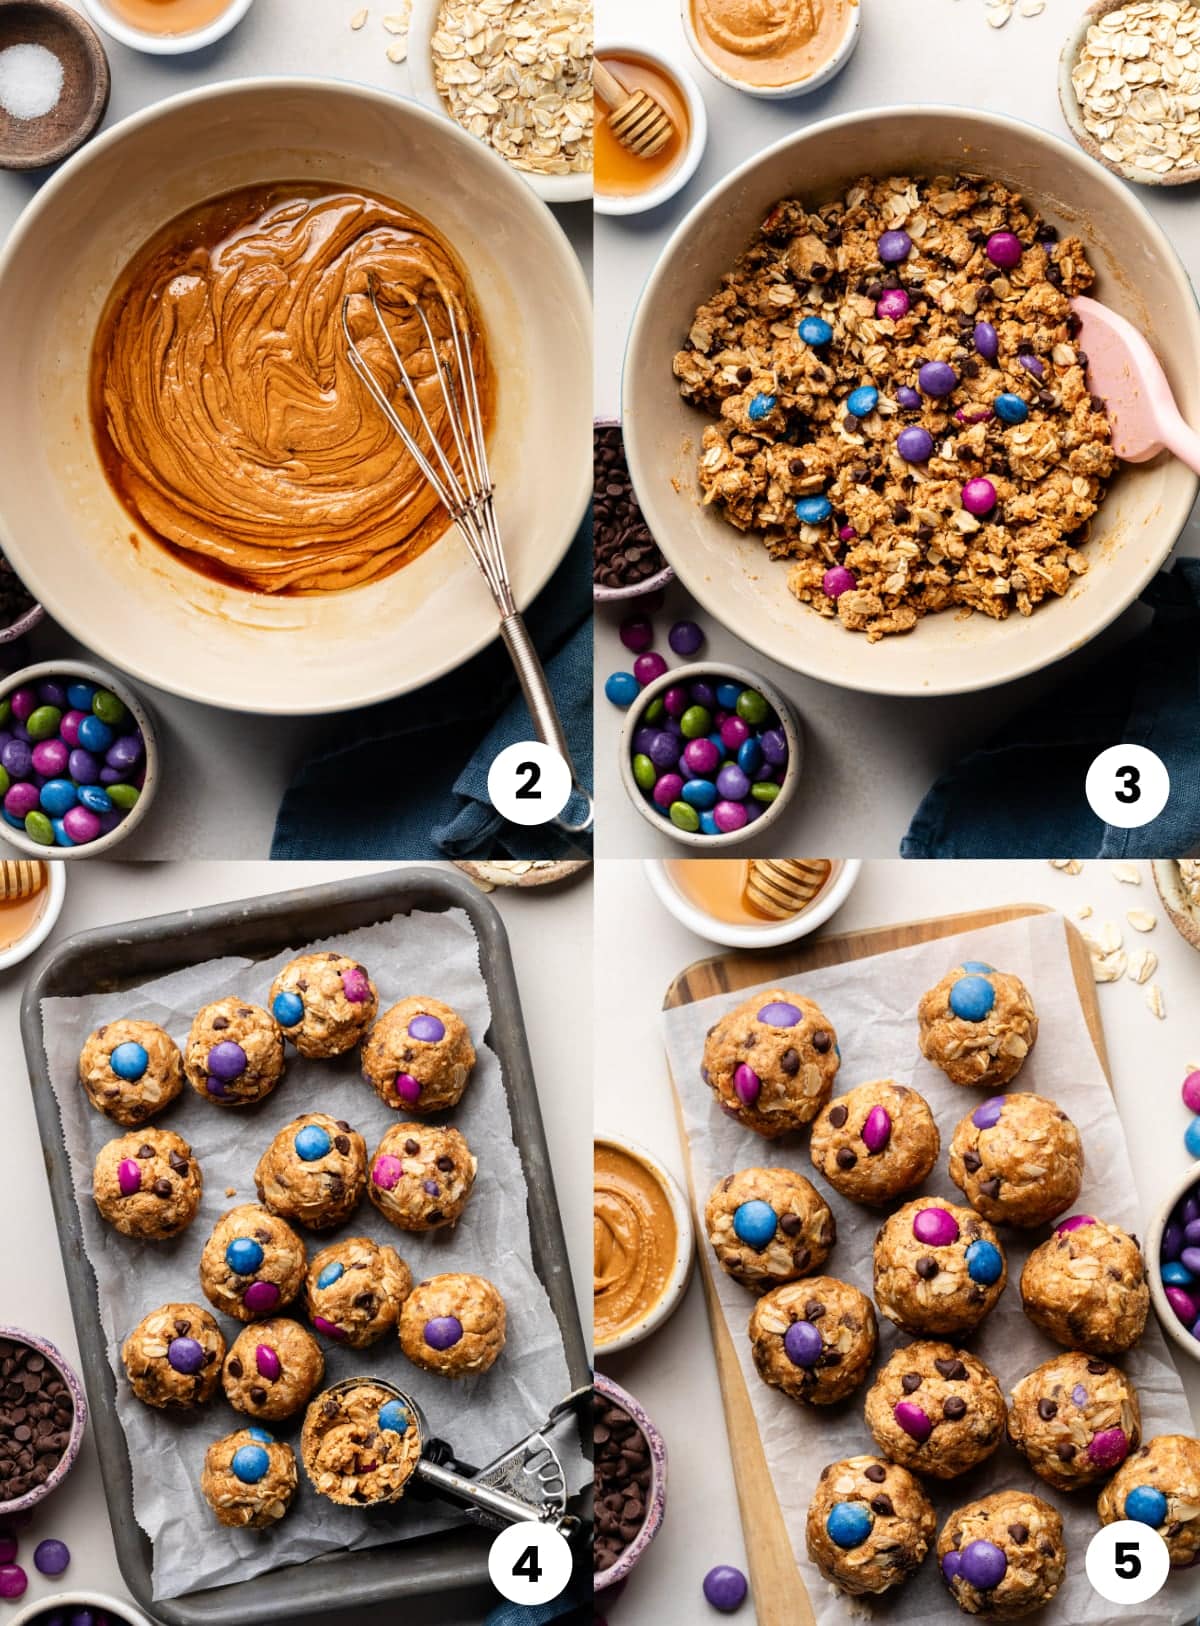
- Prep: Line a baking sheet or serving dish with parchment paper.
- Mix: In a medium bowl, mix together the peanut butter, honey, and vanilla extract.
- Fold: Add the rolled oats, protein powder, sea salt, chocolate chips, and candy coated pieces to the bowl. Fold everything together with a rubber spatula until combined. The dough should be thick and slightly sticky.
- Roll: Using a cookie scoop or spoon, scoop out 2 tablespoons of the dough and roll it into balls. Make sure to intentionally grab some of the candy pieces with each ball of dough so they are evenly distributed. Place each ball on the prepared baking sheet.
- Chill: Chill the balls in the fridge for 30 minutes, then store them in the fridge in an airtight container for 1-2 weeks.
Recipe Tips
- Use a flexible spatula. It’s the easiest way to fold everything together evenly without overworking the dough.
- Place on parchment paper. Scoop the protein balls onto a baking sheet lined with parchment paper, then place them in the fridge to chill. Once chilled, transfer to a zip-top storage bag and place them in the fridge or freezer.
- Scoop intentionally. A 2-tablespoon cookie scoop works perfectly. When scooping, try to grab a few candy pieces with each scoop so they’re evenly distributed in every bite.
- Stick with vanilla protein powder. The protein powder you use will impact the flavor. A vanilla protein powder with a little added sweetness makes these taste just like monster cookies.
- Add water if needed. If your dough feels a bit dry, add ½ tablespoon of water at a time until the dough sticks together easily when rolled into a ball.
- Have fun with mix-ins. Not into the candy pieces? Swap them for white chocolate chips, chopped up dried fruit, or crushed nuts to change up the flavor.
FAQs
Can I make these gluten free?
Yes! Just be sure to use certified gluten-free rolled oats and double check that your candy-coated chocolate pieces are gluten free, as those can vary by brand. The rest of the ingredients are naturally gluten free.
What type of protein power works best?
A vanilla whey protein powder works best for both the flavor and texture of the balls. Whey is best for muscle protein synthesis blends smoothly in recipes. Plant based or beef protein powders can work too, but you may need to add a bit of water to get the dough to stick together.
Can kids eat monster cookie protein balls?
Yes. These are kid friendly and made with simple, familiar ingredients. Plus, they taste like cookies! My kids love them with lunch or as a snack after sports practice or games.
Storage
STORE: For best results, place the rolled monster cookie protein balls on a parchment-lined baking sheet and chill in the fridge for about 30 minutes. This helps them firm up and prevents sticking. Once set, transfer to an airtight container and store in the fridge for up to 1–2 weeks.
FREEZE: These are great for the freezer and perfect for making in bulk. Chill the protein balls first on a baking sheet, then transfer to a freezer-safe bag or container. They’ll keep for up to 3 months. Let them thaw for a few minutes before eating, or enjoy straight from the freezer if you like a firmer bite (my favorite).
More Protein Recipes
- Cookie Dough Protein Balls
- Pumpkin Protein Balls
- Protein Mug Cake
- Protein Banana Muffins
- Chocolate Protein Pudding

Monster Cookie Protein Balls
These no bake monster cookie protein balls are incredibly delicious and easy to make. They mix up in under 10 minutes and are great for meal prep. The perfect sweet and satisfying snack for busy days!
Prep: 10Total: 10 minutes
Servings: 16 1x
Ingredients
- ⅔ cup natural peanut butter
- 3 tablespoons honey
- 1 teaspoon vanilla extract
- ¾ cup rolled oats
- ⅓ cup vanilla protein powder
- ¼ teaspoon sea salt
- 3 tablespoons mini chocolate chips
- 3 tablespoons candy coated chocolate pieces (like Unreal)
Instructions
- Prep: Line a baking sheet or serving dish with parchment paper.
- Mix: In a medium bowl, mix together the peanut butter, honey, and vanilla extract.
- Fold: Add the rolled oats, protein powder, sea salt, chocolate chips, and candy coated pieces to the bowl. Fold everything together with a rubber spatula until combined. The dough should be thick and slightly sticky.
- Roll: Using a cookie scoop or spoon, scoop out 2 tablespoons of the dough and roll it into balls. Make sure to intentionally grab some of the candy pieces with each ball of dough so they are evenly distributed. Place each ball on the prepared baking sheet.
- Chill: Chill the balls in the fridge for 30 minutes, then store them in the fridge in an airtight container for 1-2 weeks.
Notes
- If your dough feels a bit dry, add ½ tablespoon of water at a time until the dough sticks together easily when rolled into a ball.
- I recommend vanilla whey protein powder for the best texture and flavor. If you use whey protein powder or plant based protein powder, the dough will be more dense and soft—just like cookie dough! If you use grass fed beef protein isolate, the dough will be slightly more sticky due to the collagen content.
- I like to use the Unreal candy coated pieces for this recipe.
- Not into the candy pieces? Swap them for white chocolate chips, dried fruit, or crushed nuts to change up the flavor.
- Roll smaller “mini” balls for kids. They love them, and they pack perfectly in lunch boxes!
Recipe by: Noelle Tarr / Coconuts and Kettlebells | Photography by: Casey Colodny / The Mindful Hapa